
Travel Photography
Travel Photography
Traveling can provide you with the opportunity
to take some of your most interesting
photos. Foreign locations can be truly inspiring.
Filled with strange and wonderful people
and scenes they can fuel your creativity,
but don’t forget that there are many travel 
Rue Damrémont, Paris, France. This is a perfect example of travel and streetphotography. This shot shows the Paris nightlife coming alive just after sunset. The ratherslow shutter speed blurs the people giving you a sense of motion while the rest of thescene is in sharp focus. Shot with a Nikkor 18-70mm f/3.5-4.5 lens zoomed to 18mm, ISO800 at f/3.5 for 1/25 second.
Travel photography doesn’t just include
photo-taking. One of the most important
aspects about this type of photography
starts before you even leave for your trip
packing. Most people who have traveled
extensively know that packing light is a must.
Lugging around every piece of camera
equipment you have can be physically
exhausting. Take only what you need, but
don’t leave any essentials behind. Many
times you can cover all of your bases by
using smaller pieces of gear. If I’m going on
a short hike often I use the smaller
55-200mm f/4-5.6 VR lens rather than bringing
along a huge 70-200 f/2.8 VR. I may lose
a couple of stops of light, but I save myself
some space and weight. It’s the small things
that can make a big difference. If it’s in your
budget the 18-200mm VR lens makes an
excellent travel lens encompassing a wide
range of focal lengths in one compact lens.
Uncommon architecture, people, and landscape
features are just a few of the things
you may find on your ventures. Most of the
topics covered in this chapter can be related
to your travel photography, from abstracts to
landscapes to wildlife photos. The most
important part about travel photography is
to use your images to not only remember
what the place looked like, but also to convey
the feeling of the locale. For example,
when in a foreign place a few shots of the
local people can remind you of the cultural
differences that exist in some areas of the
world or even just regional differences. 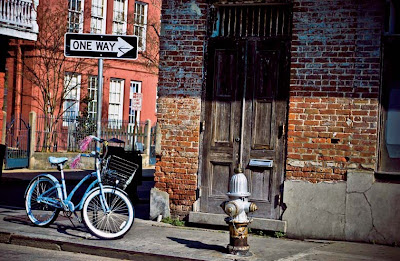
View from Lafitte’s Blacksmith Bar, Bourbon Street, New Orleans, Louisiana. With most
of the recent shots of New Orleans centering on the destruction from the hurricane, I
wanted to show New Orleans in a different light. This view just struck me as wholly “New
Orleanian.” Shot with a Nikkor 18-55mm f/3.5-5.6 VR lens zoomed to 55mm, ISO 100 at
f/5.6 for 1/800 second.
Setup Practice Picture: is a shot of the statue honoring the
soldiers who fought for Texas independence. In the background is the
rotunda of the capitol building. Although I didn’t have to travel far to
take this picture, Austin is the capital of Texas and is a travel destination
for many people from here and abroad. My attempt was to show a little
bit about the spirit of Texas.
On Your Own: Try to capture the feeling and spirit that exists in
different places of the world. You can also take a series of images to tell
a story about your travels.
Lighting Practice Picture: This was shot just after sunset, using only the light
that was provided by the fading sun. I first metered on the rotunda of
the capitol to capture the color of it and the sky allowing the statue to
fall mostly in dark shadow for dramatic effect. I locked the exposure
then recomposed the shot-locking focus on the statue.
On Your Own: A lot of the time when traveling you don’t have the time
to wait for the ideal lighting conditions to come along so you may have
to make do with what you have. You can also try to plan your trip so
that you arrive at your destination when the lighting is likely to be ideal.
Lens Practice Picture: Nikkor 17-55mm f/2.8 zoomed to 50mm. I used a
fairly long setting in order to create a close, frame-filling crop.
On Your Own: Use a wide-angle setting to capture vistas or you can
choose to zoom in to focus on smaller details. Having a zoom lens that
goes from a wide-angle to a short telephoto is almost a necessity when
traveling. This type of lens is very versatile and can be used to cover
almost any type of scene you encounter.
Camera Settings Practice Picture: I used Aperture Priority mode to control the depth of field. The image was shot in RAW so I could be sure to adjust the white
balance to my preference later in post-processing.
On Your Own: Shooting in RAW can give you a little insurance in case
your camera doesn’t record the white balance or exposure exactly as
you want it.
Exposure Practice Picture: ISO 400 at f/2.8 for 1/50 second. I also set the
Exposure compensation to –0.7EV in order keep the statue looking
dark and giving the background colors more saturation. The aperture
was opened wider to give the capitol a softer appearance.
On Your Own: Underexposing a bit when photographing areas with
both light and dark areas can give your colors deeper saturation and
can give your image a more dramatic feel.
Travel photography tips
✦ Keep your gear close. When traveling,
especially abroad, keep a
close eye on your gear. Many
thieves target camera gear because
it’s fairly expensive and small
enough to grab and make a quick
getaway.
✦ Bring plenty of memory. There’s
nothing worse than missing a
once-in-a-lifetime shot because
you ran out of space on your SD
card. It’s also a good idea to bring
along a few memory cards. It can
be better to have four 2GB cards
as opposed to one 8GB card in
case your card fails or malfunctions.
It’s best not to have all of
your eggs in one basket.
Traveling can provide you with the opportunity
to take some of your most interesting
photos. Foreign locations can be truly inspiring.
Filled with strange and wonderful people
and scenes they can fuel your creativity,
but don’t forget that there are many travel

Rue Damrémont, Paris, France. This is a perfect example of travel and streetphotography. This shot shows the Paris nightlife coming alive just after sunset. The ratherslow shutter speed blurs the people giving you a sense of motion while the rest of thescene is in sharp focus. Shot with a Nikkor 18-70mm f/3.5-4.5 lens zoomed to 18mm, ISO800 at f/3.5 for 1/25 second.
opportunities right in your own backyard.
Domestic travel can be just as compelling as
foreign travel.
Domestic travel can be just as compelling as
foreign travel.
Travel photography doesn’t just include
photo-taking. One of the most important
aspects about this type of photography
starts before you even leave for your trip
packing. Most people who have traveled
extensively know that packing light is a must.
Lugging around every piece of camera
equipment you have can be physically
exhausting. Take only what you need, but
don’t leave any essentials behind. Many
times you can cover all of your bases by
using smaller pieces of gear. If I’m going on
a short hike often I use the smaller
55-200mm f/4-5.6 VR lens rather than bringing
along a huge 70-200 f/2.8 VR. I may lose
a couple of stops of light, but I save myself
some space and weight. It’s the small things
that can make a big difference. If it’s in your
budget the 18-200mm VR lens makes an
excellent travel lens encompassing a wide
range of focal lengths in one compact lens.
Uncommon architecture, people, and landscape
features are just a few of the things
you may find on your ventures. Most of the
topics covered in this chapter can be related
to your travel photography, from abstracts to
landscapes to wildlife photos. The most
important part about travel photography is
to use your images to not only remember
what the place looked like, but also to convey
the feeling of the locale. For example,
when in a foreign place a few shots of the
local people can remind you of the cultural
differences that exist in some areas of the
world or even just regional differences.

View from Lafitte’s Blacksmith Bar, Bourbon Street, New Orleans, Louisiana. With most
of the recent shots of New Orleans centering on the destruction from the hurricane, I
wanted to show New Orleans in a different light. This view just struck me as wholly “New
Orleanian.” Shot with a Nikkor 18-55mm f/3.5-5.6 VR lens zoomed to 55mm, ISO 100 at
f/5.6 for 1/800 second.
Setup Practice Picture: is a shot of the statue honoring the
soldiers who fought for Texas independence. In the background is the
rotunda of the capitol building. Although I didn’t have to travel far to
take this picture, Austin is the capital of Texas and is a travel destination
for many people from here and abroad. My attempt was to show a little
bit about the spirit of Texas.
On Your Own: Try to capture the feeling and spirit that exists in
different places of the world. You can also take a series of images to tell
a story about your travels.
Lighting Practice Picture: This was shot just after sunset, using only the light
that was provided by the fading sun. I first metered on the rotunda of
the capitol to capture the color of it and the sky allowing the statue to
fall mostly in dark shadow for dramatic effect. I locked the exposure
then recomposed the shot-locking focus on the statue.
On Your Own: A lot of the time when traveling you don’t have the time
to wait for the ideal lighting conditions to come along so you may have
to make do with what you have. You can also try to plan your trip so
that you arrive at your destination when the lighting is likely to be ideal.
Lens Practice Picture: Nikkor 17-55mm f/2.8 zoomed to 50mm. I used a
fairly long setting in order to create a close, frame-filling crop.
On Your Own: Use a wide-angle setting to capture vistas or you can
choose to zoom in to focus on smaller details. Having a zoom lens that
goes from a wide-angle to a short telephoto is almost a necessity when
traveling. This type of lens is very versatile and can be used to cover
almost any type of scene you encounter.
Camera Settings Practice Picture: I used Aperture Priority mode to control the depth of field. The image was shot in RAW so I could be sure to adjust the white
balance to my preference later in post-processing.
On Your Own: Shooting in RAW can give you a little insurance in case
your camera doesn’t record the white balance or exposure exactly as
you want it.
Exposure Practice Picture: ISO 400 at f/2.8 for 1/50 second. I also set the
Exposure compensation to –0.7EV in order keep the statue looking
dark and giving the background colors more saturation. The aperture
was opened wider to give the capitol a softer appearance.
On Your Own: Underexposing a bit when photographing areas with
both light and dark areas can give your colors deeper saturation and
can give your image a more dramatic feel.
Travel photography tips
✦ Keep your gear close. When traveling,
especially abroad, keep a
close eye on your gear. Many
thieves target camera gear because
it’s fairly expensive and small
enough to grab and make a quick
getaway.
✦ Bring plenty of memory. There’s
nothing worse than missing a
once-in-a-lifetime shot because
you ran out of space on your SD
card. It’s also a good idea to bring
along a few memory cards. It can
be better to have four 2GB cards
as opposed to one 8GB card in
case your card fails or malfunctions.
It’s best not to have all of
your eggs in one basket.
✦ Do some research on your destination.
Knowing what type of
scenery to expect can help you to
decide what kind of equipment to
pack. For example, if you know
you’ll be shooting mostly landscapes,
a wide-angle lens will be
needed. If you’re going to be shooting
a lot of indoor subjects you may
need a fast lens or a tripod.
Knowing what type of
scenery to expect can help you to
decide what kind of equipment to
pack. For example, if you know
you’ll be shooting mostly landscapes,
a wide-angle lens will be
needed. If you’re going to be shooting
a lot of indoor subjects you may
need a fast lens or a tripod.
เขียนโดย wut เมื่อ
22:05
0 ความคิดเห็น
![]()


